Browsing Category

Dessert

Raspberry Trifles!

Raspberry Trifles {Granola Girl Bakes}

Summer has almost come to an end! Can you believe it?! But it’s not gone yet and seeing I still have 2 weeks left until I have to officially say “goodbye” to summer I decided to make a summer favorite! Raspberry Trifles. 🙂 Well, these are a summer/fall/winter/spring favorite, really!  Freshly baked pound cake, super tart raspberries, a hint of lemon, sweet cream-cheese filling, and freshly whipped cream{sweetened with maple ’cause it doesn’t get much better than pure maple!} makes for a rather delightful combination that will definitely satisfy your sweet tooth! 🙂

Note: I used pure maple to sweeten the cream but you can definitely use regular powder sugar! Both will work. (:

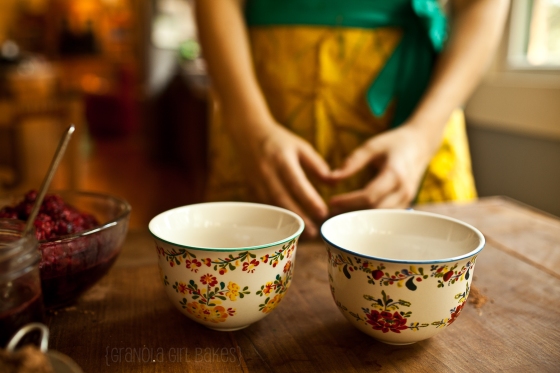
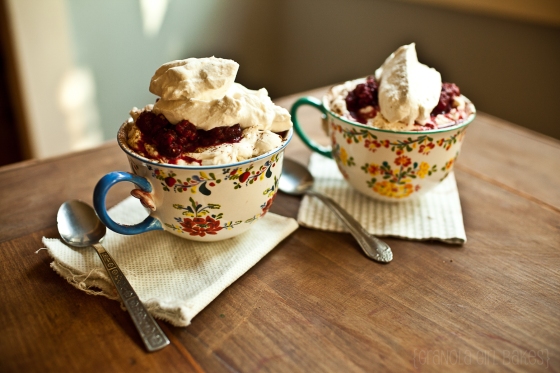
Yields 8 mugs or 1 larger trifle dish!

Ingredients

  • 1 1/2 cups heavy cream
  • 1/4 cup pure maple{or powdered sugar!}
  • 1 tsp pure vanilla extract
  • 2 8oz packages creamcheese{softened!}
  • 2 tsp lemon juice
  • 2 tsp pure vanilla extract
  • 1/2 cup white sugar
  • 1  pound cake
  • 10 oz frozen raspberries{thawed and drained BUT reserve juice!}
  • cocoa powder for dusting!

Directions

  1. In a medium bowl, beat cream with 1/4 cup maple or sugar until stiff peaks form. In another bowl, cream together cream cheese, lemon juice, vanilla and 1/2 cup sugar. Fold 2 cups of whipped cream into cream cheese mixture. Reserve remaining whipped cream.
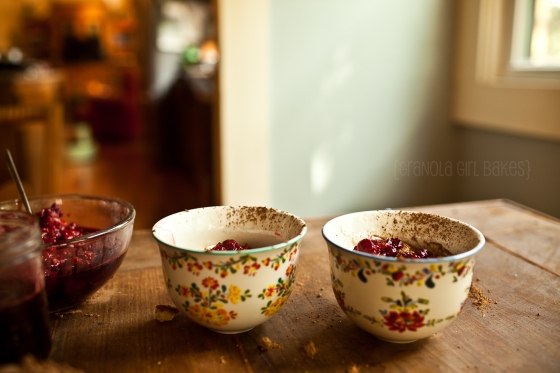
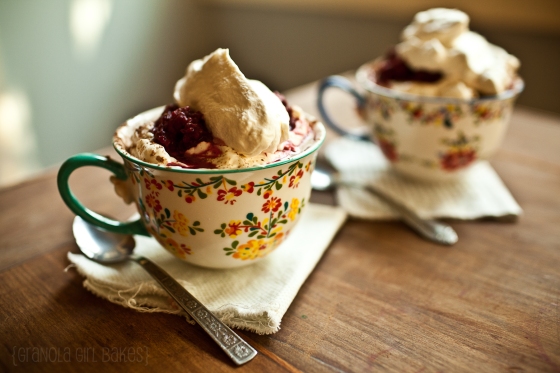
  2. Cube pound cake into 18 – 1/2 inch slices. Drain raspberries, reserving juice. Line the bottom of a 3 quart glass bowl or trifle bowl with one-third of the cake slices. If using mugs do the same but on a smaller scale. 🙂  Drizzle with some raspberry juice, then spread one-fourth of the cream cheese mixture over cake. Sift one-fourth of the cocoa over that. Sprinkle with one-third of the raspberries. Repeat layers twice. Top with remaining cream cheese mixture, whipped cream and sifted cocoa. Cover and refrigerate for at least 1 hour but best when you let the set overnight!
  3. Grab a cup of coffee and about 7 or so good friends. ENJOY!! 🙂

[vimeo http://www.vimeo.com/73992460 w=560&h=315]
Raspberry Trifles {Granola Girl Bakes} 17

Raspberry Trifles {Granola Girl Bakes} 10

Raspberry Trifles {Granola Girl Bakes} 11

Raspberry Trifles {Granola Girl Bakes} 12 Raspberry Trifles {Granola Girl Bakes} 14

Raspberry Trifles {Granola Girl Bakes} 15

Raspberry Trifles {Granola Girl Bakes} 16

Raspberry Trifles {Granola Girl Bakes} 3

Caramel Pecan Crumb Peaches à la mode

Caramel Crumb Pecan Peaches :: Granola Giril Bakes 5

I have been dreaming up this recipe for about 10.5 months now! 😉 Just waiting for peach season to start in Texas and then free time to concoct the recipe! So it happened today that I had an early morning photo shoot and then I took the rest of the afternoon off to “kid-sit” while my parents went to an appointment. 5 kiddos under 12, Lunch on and off, cleaned up, then a diaper change, get cups of water, and it’s NAP TIME or what we call “quiet time”! 🙂 I set their timer for 1 hour and then thought, “why not see if I can’t create the recipe in this 1 hour?” Challenging? For me, yes! 🙂 If I take pictures of my baking, it takes about twice as long to bake whatever I am baking but I was up for the challenge!

The recipe I had been dreaming up? A fresh peach halved, drizzled with a delicious caramel, topped with a pecan maple-sweetened crumb topping, baked until soft and golden, and then topped off{while still warm} with a dollop of ice cream and {generous}caramel drizzle! And it just so happened that I have what seems to be{thankfully :)} a “never-ending jar” of slickepott and our extremely generous neighbor blessed us with pecans from her pecan tree. So I was set! 🙂 Yep, it was just as good as I hoped it would be! The great thing about so many siblings is that you only get a taste of whatever you make…. so you unknowingly  go on a diet unless you make a dozen and a half of something! This recipe made 2 and once I was finished the kiddos quickly devoured them! 😉

Caramel Crumb Pecan Peaches :: Granola Giril Bakes  15

Yields 2 delightfully decadent servings!

Ingredients

  • 1 fresh and perfectly ripened peach
  • Caramel Sauce {Used slickepott but if you can’t get a jar home-made is second best. 😉 I have a recipe ::here::}
  • 2 1/2 tbsp butter
  • 1 tbsp pure maple syrup
  • 1/4 cup pecans {chopped}
  • 1/4 cup flour
  • 1/2 tsp cinnamon
  • dash salt
  • vanilla ice cream
  1. Preheat oven to 350 degrees!
  2. Place  flour, maple, cinnamon, and salt in bowl. Cut in 2 TBS butter and then stir in nuts! Place in freezer for 10 minutes.
  3. Generously butter a glass baking dish. Half and pit the peach! Drizzle with around 1 tbsp caramel sauce per half. Top both halves with crumb topping and bake for 25 minutes or until crumb is golden and peach soft! You will be able to tell by the smell!! 😉
  4. Allow to cool for 5 minutes then plate! Top with vanilla ice cream and a generous amount of Caramel!
  5. Enjoy!! 🙂

[vimeo http://www.vimeo.com/72950875 w=560&h=315]

Caramel Crumb Pecan Peaches :: Granola Giril Bakes 17

Caramel Crumb Pecan Peaches :: Granola Giril Bakes  20

Caramel Crumb Pecan Peaches :: Granola Giril Bakes  22

1

Caramel Crumb Pecan Peaches :: Granola Giril Bakes  25

Caramel Crumb Pecan Peaches :: Granola Giril Bakes  28

Caramel Crumb Pecan Peaches :: Granola Giril Bakes

3

2

Caramel Crumb Pecan Peaches :: Granola Giril Bakes 1

Caramel Crumb Pecan Peaches :: Granola Giril Bakes 10

Cinnamon Roll Espresso Cupcakes

Cinnamon Roll Cupcakes :: Granola Girl bakes 18

Have I mentioned my family has the ability to consume extremely rich food?! 😉 It was a beautiful Sunday afternoon, and was FREE for me to get in the kitchen & experiment! The first time in a couple of weeks but what will I make? Dessert for sure! Not really in the mood for a fruity dessert today, perhaps chocolate and caramel but, than again, I have a dessert planned for that combinations that requires a few more ingredients from the grocery store. Then it came to me, Cinnamon Roll Espresso Cupcakes!! 🙂 I know, cupcakes again. But they happen to be my favorite! 🙂 A rather sweet combination of vanilla cake and buttery cinnamon-swirl, with a rather delightful espresso glaze, and top it off with an extremely cream-cheesy icing! Sprinkle a little cinnamon and call it a cupcake! 🙂 My sister said they were “indescribably delicious!” 🙂

Original recipe credits go to bakingdom.com with a few minor tweaks from me.

Yields 24 delicious cupcakes!

Cinnamon SWIRL

  • 1/2 cup butter {melted}
  • 2/3 cup brown sugar
  • 2 tsp cinnamon

FOR THE CUPCAKES

  • 3 cups flour
  • 1 cup sugar
  • 3 tsp baking powder
  • 1 tsp salt
  • 1 cup butter{room temperature}
  • 1 cup sour cream
  • 4eggs
  • 2 tsp vanilla extract

Coffee Icing

  • 4 tbs butter {softened}
  • 2-3 cups powder sugar
  • 1 tsp vanilla extract
  • 3 tbs (15 to 30 ml) espresso or rather strong coffee
  • 8oz cream cheese {at room temperature}
  • 1/4 cup butter {at room temperature}
  • 4 cups powder sugar
  • 1 tsp vanilla
  1. To make the filling: In a small bowl, stir all of the ingredients together until combined. Set aside!
  2. To make the cupcakes: Preheat oven to 350 degrees. Line muffin pans with cupcake papers!
  3. In a large bowl, or the bowl of a standing mixer, combine the flour, sugar, baking powder, and salt. Add the butter, sour cream, eggs, and vanilla and beat until smooth. Scrape the bowl, making sure there are no streaks of flour remaining.
  4. Place 1 1/2 tablespoons of batter in each of the paper liners in the prepared muffin pan. Make a small well in the middle of each cup of batter with a toothpick, Stir the filling to make sure the butter is combined, then spoon a scant 1 teaspoon of the filling into each cup. Use a toothpick to swirl the filling and batter together.
  5. Add another 1 1/2 tablespoons of batter to each cup and repeat the filling/swirling process.
  6. Bake for 18 to 22 minutes, until a toothpick inserted in the center comes out clean. Transfer to a wire cooling rack and allow to cool completely before frosting.
  7. To make the icing: In a medium bowl, beat the butter and sugar together until light and fluffy. Stir in the vanilla until combined. Add the espresso until desired consistency is reached (I only used all 4 tablespoons). For more coffee flavor, add more coffee, but you may need to add additional confectioners’ sugar to keep a good consistency.
  8. Ice the cooled cupcakes with the coffee icing. Allow to sit for 15 to 20 minutes, then pipe on cream cheese icing!
  9. Enjoy!! 🙂

[vimeo http://www.vimeo.com/72627808 w=560&h=315]
Cinnamon Roll Cupcakes :: Granola Girl bakes

Cinnamon Roll Cupcakes :: Granola Girl bakes 2

Cinnamon Roll Cupcakes :: Granola Girl bakes 3

Cinnamon Roll Cupcakes :: Granola Girl bakes 5

Cinnamon Roll Cupcakes :: Granola Girl bakes 6

Cinnamon Roll Cupcakes :: Granola Girl bakes 7

Cinnamon Roll Cupcakes :: Granola Girl bakes 9

Cinnamon Roll Cupcakes :: Granola Girl bakes 12

Cinnamon Roll Cupcakes :: Granola Girl bakes 11

Cinnamon Roll Cupcakes :: Granola Girl bakes 22

Cinnamon Roll Cupcakes :: Granola Girl bakes 14

Cinnamon Roll Cupcakes :: Granola Girl bakes 21

Salted Caramel Sticky Buns with Cream Cheese Glaze

Sticky Buns main 1

Slickepott sticky buns :: Granola Girl Bakes 3
Salted Caramel Sticky Buns anyone? 🙂 Slickepott sent along a rather delicious jar of their Caramel Sauce a couple of weeks back and I have been dreaming up recipes ever since! Today I finally had a few hours free and was able put my apron on and get into the kitchen to create! I had a hankering for a sticky bun but not just any sticky bun, a Salted Caramel Sticky Bun with a delightful cream cheese glaze drizzled on top! Sweet buttery dough, all natural Caramel with vanilla bean & sea salt, a hint of cinnamon, pecans, and a cream cheese glaze…. Just a little tip: Sticky buns are best for dessert! 😉

Yields 24 Sticky Buns!

Ingredients

  • 2 1/2 tsp active dry yeast
  • 1 cups warm water
  • 1 tsp sugar
  • 5 tbsp salted butter{melted}
  • 1 cups warm milk
  • 1 1/2 tsp salt
  • 1/3 cup sugar
  • 5 or so cups flour
  • 1 13 oz jar slickepott Caramel sauce{or 13 oz regular caramel plus 1/8 tsp salt}
  • 2-2 1/2 cups chopped pecans
  • 1 stick butter{softened}
  • 1 cup packed brown sugar
  • 1 tbsp cinnamon

glaze

  • 4 oz cream cheese{softened}
  • 1/4 cup butter {melted}
  • 1/3 cup milk
  • 1 1/2 tsp vanilla extract
  • 3 cups powder sugar
  1. Activate yeast in warm water and 1 tsp sugar. Once activated, add 5 tbsp melted butter, milk, salt, and 1/3 cup sugar and combine! Add enough flour to make a firm yet sticky dough.
  2. Place on a generously floured surface and knead for 5 minutes adding flour when necessary {be super careful not to add too much flour!!} Let rise in a buttered bowl until doubled and dough bounces back to the touch{about 45 minutes!}
  3. Heavily butter 3 round 9″ cake pans, cover the bottom of each pan with caramel, and pecans.
  4. Flour a clean surface and roll out dough forming a large triangle{about 1/2 inch thick}. Spread 1 stick softened butter on top of the dough then sprinkle with brown sugar and cinnamon. Roll up length wise and slice into 1.5″ think rolls. Place in pans, cover, and once again to rise until double{about 30-45 minutes}! Preheat oven to 400 degrees.
  5. Meanwhile, prepare the glaze! Place butter, cream cheese, milk, and vanilla in an electric mixer. Beat to combine then slowly add powder sugar. Set aside until sticky buns are baked!
  6. Once the rolls have risen, bake for 14-17 minutes{or until golden on top and baked through}! Immediately flip onto a serving plate, allowing them to cool for 10-15 minutes. Generously drizzle glaze over the sticky buns… very generously!!
  7. Fix a rather large cup of coffee and enjoy your Salted Caramel Sticky Bun! 🙂

[vimeo 70714922 w=580 h=326]


Slickepott sticky buns

Slickepott sticky buns :: 6 Granola Girl Bakes 5

Slickepott sticky buns :: 10 Granola Girl Bakes

Slickepott sticky buns :: 9 Granola Girl Bakes 5 Slickepott sticky buns :: 7 Granola Girl Bakes 5

Slickepott sticky buns :: 11 Granola Girl Bakes 5

Slickepott sticky buns :: Granola Girl Bakes 18

Sticky Buns main 4

Sticky Buns main 3

Raspberry Swirl Cupcakes {Video}

Raspberry Swirl cupcakes 10

Okay, so I have a bit of an obsession with cupcakes… does it show? 🙂 And I have been dreaming up this cupcake the last week… tart raspberry, lemon, a bit of orange, all baked into a sweet pound cake base and topped of cream cheese frosting. Yes, I know what your thinking, “wow, that sounds rich!” but the flavors kept on going through my mind and I knew I had to give it a try!  It is quite strange for a dessert to sound good to me that doesn’t contain a large amount of chocolate but this one did! So, with a few kidlets by my side, I set out to concoct the dream cupcake yesterday! 😉 It was well worth the time and effort and the Raspberry Swirl Cupcake has now taken 1st place on my “favorite cupcakes” list! A decadent moist cake with a punch of summer flavor!

Side note: If you not a huge raspberry fan, leave it our! The younger crowd wasn’t too fond of the idea of raspberry so I didn’t put it in their cupcakes!

Yields 24-30 delightful cupcakes

Ingredients

  • 1 1/2 cups (3 sticks) salted butter{softened}
  • 1 bar (8 ounces) cream cheese{softened}
  • 3 cups sugar
  • 5 large eggs
  • 1 tbs pure vanilla extract
  • 3 cups all-purpose flour
  • 2 tsp salt
  • The zest of 1 orange
  •  The zest and juice of 3 lemons
  • Raspberry Preserves

Icing

  • 2 sticks butter{softened}
  • 1 pkg cream cheese{softened}
  • 1/2 cup milk
  • 1 tsp almond extract
  • 1tbs pure vanilla extract
  • 6-8 cups powder sugar

Directions

  1. Preheat oven to 350 degrees. With an electric mixer, beat butter and cream cheese until smooth. Add sugar; beat until light and fluffy, about 5 minutes. Add eggs, one at a time, beating well after each addition. Mix in vanilla, lemon juice, and zest. With mixer on low, add flour and salt in two additions, beating until just combined.
  2. Line muffin tins with cupcake liners or lightly butter and flour tins to prevent sticking! Scoop a mounding 1/4 cup batter into each cup, dollop about a tbs raspberry preserves per cupcake and swirl with a knife!
  3. Bake until golden and a toothpick inserted in the centers comes out almost clean, 15-18 minutes.
  4. Cool 10 minutes in the pan. Then cool completely on a wire rack.
  5. In the mean time prepare the icing! Beat butter, cream cheese, milk, almond extract, & vanilla until combined. Slowly but surely add in the powdersugar
  6. Once the cupcakes are completely cooled, pipe icing on thick and finish up with a small dollop of raspberry preserves.
  7. Enjoy! 🙂

[vimeo 69923418 w=620 h=348]
Raspberry Swirl cupcakes 9Raspberry Swirl cupcakes 1

Raspberry Swirl cupcakes 4
Raspberry Swirl cupcakes 8

Salted Caramel Mocha Cupcakes {reblogged!}

Salted Caramel Mocha Cupcakes :: Granola Girl Bakes 10 Salted Caramel Mocha Cupcakes ::14 Granola Girl Bakes 13

Yes, I have posted this recipe before! BUT this time I decided to skip making my own hot fudge & caramel. 🙂 You see, I have heard of this company called slickepott for quite some time now and when I didn’t win a give-away for their caramel sauce I just decided it was time to order some! 🙂 And since I was already ordering a jar of caramel sauce{Just to make the purchase a little more sweet} I decided to add a jar of hot fudge too! 😀 So, my Salted Caramel Mocha Cupcakes simplified with delicious all-natural but pre-made caramel & hot fudge! A delicious layer of chocolate pound cake, then sweet cream-cheesey espresso, add a layer of caramel then hot fudge, and top it off with a salted caramel icing! Super easy and quick, had these cupcakes done in 1 hour! And forewarning, don’t consume too close to bed or else you will be blogging at 3am like me! 😉

Original Recipe makes 16 rather really large cupcakes!

Cake

  • 1 1/2 cups butter, softened
  • 3 cups white sugar
  • 5 eggs
  • 2 teaspoons vanilla extract
  • 2 teaspoons instant coffee granules dissolved in 1/4 cup hot water
  • 1 cup buttermilk
  • 2 cups all-purpose flour
  • 3/4 cup unsweetened cocoa powder
  • 1/2 teaspoon baking powder
  • 1 teaspoon salt

Espresso layer

  • 1 pkg cream cheese (softened)
  • 2 tbsp milk
  • 1 tbsp instant coffee
  • 2 cups powder sugar
  • 1 13oz Jar Salted Caramel or 1 Jar regular Caramel plus 1/2 tsp salt!
  • 1 14 oz Jar hot fudge sauce

Icing:

  • 1/3 cup caramel
  • 2 sticks butter (softened)
  • 1 pkg softened cream cheese
  • 4-5 cups powder sugar

Directions

  1. Preheat oven to 350 degrees F. Grease and flour a 16 8oz coffee mugs{be sure they are oven proof!} Mix together the flour, cocoa, baking powder, and salt. Set aside.
  2. In a large bowl, cream together the butter and sugar until light and fluffy. Beat in the eggs one at a time, then stir in the vanilla. Beat in the flour mixture alternately with the dissolved coffee and buttermilk. Pour batter into prepared mugs.
  3. Bake in the preheated oven for 20-25 minutes, or until a toothpick inserted into the center of the cakes comes out clean. Let cool completely!
  4. While cake is baking Beat all latte layer ingredients on high until light and fluffy! After cakes have cooled, add latte layer. Spread evenly over each cupcake.
  5. Next spread 3/4 cup caramel evenly over all 16 cupcakes. Then follow with hot fudge
  6. Now it’s time for the icing! Pipe generously on top{I love using a ziplock with a whole cut at the tip!}
  7. Last thing to do is drizzle with caramel, find 16 hungry friends, and enjoy!! 🙂

[vimeo 68897833 w=620 h=349]
Salted Caramel Mocha Cupcakes :: Granola Girl Bakes

Salted Caramel Mocha Cupcakes :: Granola Girl Bakes 1

Salted Caramel Mocha Cupcakes :: Granola Girl Bakes 3

Salted Caramel Mocha Cupcakes :: Granola Girl Bakes 4

Salted Caramel Mocha Cupcakes :: Granola Girl Bakes 7

Salted Caramel Mocha Cupcakes :: Granola Girl Bakes 11

Salted Caramel Mocha Cupcakes :: Granola Girl Bakes 9

Fresh Fruit Cheesecake!

Granola Girl bakes:: Fresh Fruit Cheesecake 5

‘Tis the season for cheesecake!! 🙂 Okay, it is really always the season for cheesecake in my opinion but with spring & summer comes fresh fruit. So, for our Sunday dessert I made a fresh fruit cheesecake!

Original Recipe Yield 12-16 servings

Ingredients

  • 2 cups  Graham Cracker Crumbs
  • 6 tbsp butter, melted
  • 6 tbsp sugar
  • 5 packages cream cheese, softened
  • 1 cup sugar
  • 3 tablespoons flour
  • 1 tablespoon vanilla
  • 1 cup sour cream
  • 4 eggs
  • The zest of 2 lemon
Topping
  • 1 cup sour cream
  • 1/3 cup sugar
  • 1 1/2 tsp vanilla
  • 1 1/2 cups fresh blueberries
  • 1 1/2 cups fresh strawberries

Directions

  1. Heat oven to 325 degrees F if using a silver 9 inch springform pan. Mix crumbs, 6 tbsp sugar, and butter; press firmly onto bottom of pan. Bake 10 minutes.
  2. Beat cream cheese, sugar, flour and vanilla in large bowl with electric mixer on medium speed until well blended. Add sour cream; mix well. Add eggs, one at a time. Then add the zest, mixing on low-speed after each addition just until blended. Pour over crust.
  3. Bake 1 hour 10 minutes or until center is almost set. Run knife or metal spatula around rim of pan to loosen cake; cool before removing rim of pan. Refrigerate 4 hours or overnight.
  4. Mix sour cream, sugar, and vanilla until well blended. Spread evenly over cheesecake and top with fresh fruit!
  5. Enjoy!!
Granola Girl bakes:: Fresh Fruit Cheesecake 6

Outrageously Delicious Peanut Butter Chocolate Chip Cookies {Naturally Gluten Free!}

Chocolate Chip Peanut Butter Cookies 8:: Granola Girl Bakes

Yes, it is true! These are outrageously delicious and 100% naturally gluten-free! I was almost afraid to put “gluten-free” in the title because I may scare some of you off. 🙂 Believe me, I usually can’t stand{and that’s putting it mildly} flour substitutes but I can’t even taste a difference in these cookies!! The recipe originally called for white flour and white & brown sugar but a few weeks back I got the whim to try something new. So, I substituted the white flour and used ground oats{oat flour} and instead of the white & brown sugar I used pure maple syrup! To be honest, I thought the batch was going to be a huge disaster… but they were a hit and I have made several batches since!! Aaannnd they are best for breakfast. 😉

The secret to oat flour is letting the batter/dough set for a good hour or so before baking in order to absorb and stiffen a bit! Also, this recipe is just as good without the chocolate chips! So, if you’re not in the mood for chocolate, leave them out for a delicious peanut butter cookie! 🙂

Chocolate Chip Peanut Butter Cookies :: Granola Girl Bakes
Yield: 2 dozen cookies

Ingredients

  • 1/2 cup butter {softened}
  • 1 1/2 cups all-natural peanut butter{crunchy or creamy}
  • 1 cup pure maple syrup
  • 1 egg
  • 1 tbsp vanilla extract
  • 2 cups oat flour{or 2 1/2 cups old-fashioned oats ground}
  • 1 tsp baking soda
  • 1 tsp salt
  • 12 oz chocolate chips

Directions

  1. Combine butter, peanut butter, maple, egg, and vanilla extract until creamy.
  2. Add oat flour, baking soda, salt, and chocolate chips. Stir until well combined.
  3. Let dough set covered for 1 hour or refrigerate overnight.
  4. Preheat oven to 350 degrees. Spoon dough onto tray and bake for 10-13 minutes or until golden!
  5. Enjoy!! 🙂

Chocolate Chip Peanut Butter Cookies 4:: Granola Girl Bakes

Chocolate Chip Peanut Butter Cookies 2: Granola Girl Bakes
Chocolate Chip Peanut Butter Cookies 6:: Granola Girl Bakes
  Chocolate Chip Peanut Butter Cookies 7:: Granola Girl Bakes  Chocolate Chip Peanut Butter Cookies 14: Granola Girl Bakes Chocolate Chip Peanut Butter Cookies 15:: Granola Girl Bakes
Chocolate Chip Peanut Butter Cookies 8:: Granola Girl Bakes

My Sister’s Tiramisu Cupcakes ❥

tiramisu cupcakes 5

Don’t they look delicious?? Well, they taste 1,000 times better than they look. 😉 These are my sister’s Tiramisu cupcakes!  Lydia always surprises us with something unique and delicious. Whether it is a coconut cake{which is my favorite!} or oreo stuffed chocolate chip cookies, or these cupcakes. Her confections always turn out extremely delicious! A light and fluffy cupcake base, infused with espresso, and topped off with a delightfully fluffy whipped cream/cream cheese frosting & cocoa dusting!

Yield: about 28 cupcakes or 14 mugs 🙂

Ingredients

cupcakes:

  • 1¾ cups plus 2 tbsp. flour, sifted
  • 1¼ tsp baking powder
  • ¾ tsp coarse salt
  • 6 tbsp milk
  • 6 tbsp unsalted butter, at room temperature, cut into pieces
  • 5 large whole eggs plus 4 large egg yolks
  • 1½ cup sugar

Soaking syrup:

  • ½ cup freshly brewed espresso (or coffee)
  • 1 tbsp vanilla
  • 6 tbsp sugar

frosting:

  • 1½ cups heavy cream
  • 12 oz cream cheese, at room temperature
  • ¾ cup confectioners’ sugar, sifted
  • Unsweetened cocoa powder, for dusting

Directions

  1. To make the cupcakes, preheat the oven to 325˚ F.  Line cupcake pans with paper liners or lightly butter and flour 14 mugs/mason jars.
  2. Combine the  flour, baking powder, and salt in a medium bowl.  Whisk to blend; set aside.  Add the milk to a small saucepan.  Heat over medium-high heat just until bubbles appear around the edge of the pan.  Whisk in the butter until melted.  Let stand 15 minutes.
  3. In the bowl of an electric mixer, combine the eggs, egg yolks, and sugar.  Whisk lightly to blend.  Set the bowl over an inch or two of simmering water and heat, whisking occasionally, until the mixture is warm and the sugar is dissolved, about 6 minutes.  Return the bowl to the mixer base.  Whisk on high speed until the mixture is pale yellow and fluffy, and able to hold a ribbon when the whisk is lifted.
  4. Gently fold the dry ingredients into the egg mixture in three additions.  Stir ¾ cup of the batter into the milk mixture to thicken, then fold the milk mixture into the batter just until evenly incorporated.  Divide the batter between the prepared liners, filling them about three-quarters full.  Bake, rotating the pans halfway through baking, until the cakes are set and light golden, about 20 minutes.  Transfer pans to wire racks to cool slightly before removing from the pans.
  5. To make the soaking syrup, combine the hot coffee, vanilla, and sugar, and stir until the sugar is dissolved.  Place the warm cupcakes on a wire rack and place a baking sheet underneath to catch dripping liquid.  Use a pastry brush to brush the soaking liquid onto the tops of the cupcakes, repeating until the syrup is used up.  (This took me about four or five cycles of brushing).  If necessary, poke each cupcake a few times with a wooden skewer to help the syrup soak in.  Let the cupcakes cool completely before frosting.
  6. To make the frosting, add the heavy cream to the bowl of a stand mixer fitted with the whisk attachment.  Whip on medium-high speed until stiff peaks form.  Transfer to a separate bowl and return the mixer bowl to its base.  In the mixer bowl, combine the cream cheese and confectioners’ sugar and beat with the paddle attachment on medium-high speed until smooth and fluffy, about 2 minutes.  Fold about a third of the whipped cream into the cream cheese mixture with a spatula to lighten.  Gently fold in the remaining whipped cream until evenly combined.
  7.  Pipe a large dollop of frosting on top of each cupcake and dust with cocoa powder!
  8. ENJOY! 🙂

tiramisu cupcakes 1

tiramisu cupcakes 3
tiramisu cupcakes 4
tiramisu cupcakes 6

No-Bake Peanut Butter Cup Cheesecake | Naturally Gluten Free!

Peanutbutter cup cheesecake 17

Yes, its true! Naturally gluten-free!! 🙂 And on top of being gluten-free, it is also naturally sweetened with pure maple syrup. PLUS it’s delicious! This is a win/win dessert! 😉 Okay, so my sisters and I decided to get back to a healthy-ish way of eating lately but we have really missed the delightful combination of chocolate and peanut butter. Then I remembered this delicious no-bake cheesecake on one of my favorite cooking blogs and thought, “why not use the base to make a peanut butter cup cheese-cake!!!” A nutty crust, smooth cream-cheesy peanut-buttery filling, and a thick layer of chocolate ganache to top it off. Healthy? Well, it’s healthy-ish. 😉  So, without further ado, No-bake Peanut Butter Cheesecake!
Peanutbutter cup cheesecake.1

Yields: 1 9 inch round/12 servings

Crust Ingredients

  • 1 cup unsweetened shredded coconut
  • 1 cup sliced almonds
  • 3 TBS melted butter
  • 3 TBS Pure Maple syrup
  • dash salt

Directions

  1. In a food processor, blend coconut and almonds until fine. Add butter, maple, and salt. Pulse until blended!
  2. Press into a 9 inch spring-form cheesecake pan and set aside.


Peanutbutter cup cheesecake 12 Peanutbutter cup cheesecake 11 Peanutbutter cup cheesecake 10

Cheesecake Ingredients

  • 2 8oz pkg softened cream cheese
  • 1 cups all-natural unsweetened peanut butter
  • 1/2 cup pure maple syrup
  • 1/2 cup heavy cream
  • 1 tbs vanilla extract
  • 1/4 tsp salt

Ganache

  • 10 oz dark chocolate chips
  • 1 tbs vanilla extract
  • 3/4 cup heavy cream
  • 2 tbs butter

Directions

  1. Cream cream cheese, peanut butter, pure maple, 1/2 heavy cream, 1tbs vanilla, and salt in blender on med-high speed until fluffy(about 2 minutes.)
  2. Spread evenly over crust. Allow to cool in refrigerator for at least 1 hour(I let it set overnight)!

Ganache instructions

  1. Place chocolate chips and vanilla in heat-proof bowl.
  2. Bring heavy cream and butter to simmer over stove top then pour over chocolate chips. Let set for 3 minutes
  3. While it sets, loose cheesecake from spring-form.
  4. Once set for 3 minutes, whisk ganache until smooth and chocolate is combine!
  5. Spread evenly over cheesecake and refrigerate for at least 1 hours.
  6. Enjoy! 🙂

Peanutbutter cup cheesecake 8  Peanutbutter cup cheesecake 6  Peanutbutter cup cheesecake 5

Peanutbutter cup cheesecake 20Peanutbutter cup cheesecake Peanutbutter cup cheesecake-13  Peanutbutter cup cheesecake 16 Peanutbutter cup cheesecake 18